

Photography is about much more than capturing the right image. Yes, it's a lot of work, but fortunately, or unfortunately, no device can reproduce exactly what the eye can see.
Your eyes see colors vividly but the cameras adjust to the available light and that's why your photos need a little help to get as close as possible to what your eye has seen. This is where editing comes in!
Then, of course, there is the whole artistic side of photography... You know, trying to use a photo to tell a story or capture emotions. Generally when you travel, you can't control the people you take photos of (not like during a food or fashion session). So this artistic side in our edition tends to want to reflect (or amplify) this feeling or this emotion that we had at the time of the photo. (if you were enthusiastic, bringing out more color might work. If you were tired, you would make them more muted)
In short: The photos taken need editing. At a minimum, you should try to reflect what you actually saw with your eyes. Then you can go even further to tell a great story.
This post will go further by showing you how you can edit the same photo in 5 ways and get a completely different result. So you'll see why editing (and the editing choices you make) of your photos matters and the power behind it.
There are, of course, plenty of other ways to edit your photos, but we're just going to go through a few that, in our experience, are foolproof.
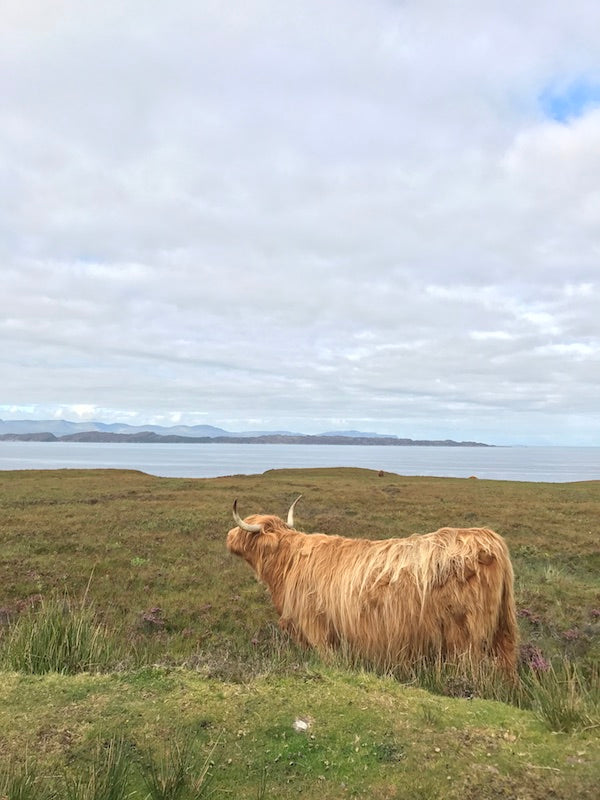
The photo we'll be using is of a Highland cow in Scotland, taken with the Pixter Wide Angle Pro , used to capture as much of the landscape as possible around our furry subject.
1.) Attenuation effect
This works well with photos taken when the weather is gray. Almost every photographer will tell you about the importance of having good light and when we think of our future travel photos, we most often think of the sun. But the weather isn't something you can control, so it's essential to make the most of it, no matter what the weather is like. We've noticed that the softening effect tends to work well on darker photos (say, rainy days), which are more complicated to edit than sunny photos. We have a motto when we take travel photos, which has always been to “make do” and it is the best way to cope when the weather is not as good as one had hoped for a trip.

How ? To do this, lower the temperature (go towards cold tones rather than warmer ones, reduce the saturation but increase the intensity of the colors so as not to lose them... A little grain on the photo can help too)
2.) Dynamic effect
This one is the simplest of all! It's all about color amplification. This doesn't work on all types of photos (we don't want neon green grass) but when it's done well, the result tends to look more like what our naked eye can see.

How ? Simply increase the saturation. Increasing the brightness can help too and, if possible, try to remove noise from the photo.
3.) Black and white effect
At first glance this seems obvious, but editing a black and white photo is not as simple as it seems. For beginners: there are several types of black and white for a photo. For a portrait for example, you need to increase the contrast as well as the clarity to bring out key areas of the face (with perhaps a little noise). If you want to take a perfect black and white photo of an apartment, you will have to reduce the colors and add grain (with little contrast). It's always good to remember that black and white photos don't work every time. For example, if you are fascinated by the Rainbow Mountains of Peru (or the Ice Museum), editing these photos in black and white would be detrimental to them and would not make them as powerful as the color originals. It is therefore important to make the right choices in these cases.

How ? You could just put your photo in black and white and play around with brightness, contrast, clarity to adjust. Instead, set the saturation to zero and then play around with the color intensity (and temperature too) and see what results you can get in your photos.
4.) HDR Effect
HDR stands for High-Dynamic-Range and its role is to make photos appear sharper than what they are. There are several ways to do this, but the end result is supposed to adjust the image to what our naked eye can see.
On your camera or phone, HDR works by taking a series of images (normally with different exposures) which are then combined to create a single image. However, creating an HDR effect while you edit is more about adjusting sharpness, clarity, contrast, highlights, and shadows. But fortunately, HDR adjustment is available on most photo editing apps and are usually just a click away. Remember though that if used too much, HDR can make your photo look a little strange. HDR is best used on photos that are not very sharp. It is not recommended to use it on images that must remain softer (for example flowers in the sun... Unless it is used in moderation).

How ? As mentioned above, you can either use the HDR setting on virtually any photo editing app (and adjust the intensity of the setting) or have fun adjusting the sharpness, clarity, contrast, highlights and shadows until you achieve the sharpness you are looking for.
5.) Blurred Effect
This works particularly well when the image has a well-defined color (for example, the hilly region of Wales. Although green is not the only color, it is predominant). This setting effectively blurs the colors (a bit like a white layer on the photo with a single color lying on top). There are plenty of colors that can be used for this setting, but remember that some work better together. For example, green (faded) on a predominantly green photo (photo) will obviously work perfectly. Green on blue would work just as well but green and red will probably give you a slightly strange result.

How ? Use the tint tool and the blend tool to create this effect. Otherwise, you can put filters or edit on apps that have predefined colors that you can use. For this example, I used green to blur the original image.
Other examples of these 5 adjustments on a different photo
Another example here is this photo of an insect taken with the lens Pixter Macro Pro while hiking in Austria, to capture a tiny subject in great detail.
Here it is edited in 5 different ways.


As you can see, I used the same type of editing for a completely different type of photo and I hope you were able to see that editing a photo in a different way can transform your photography and take it towards another level.